

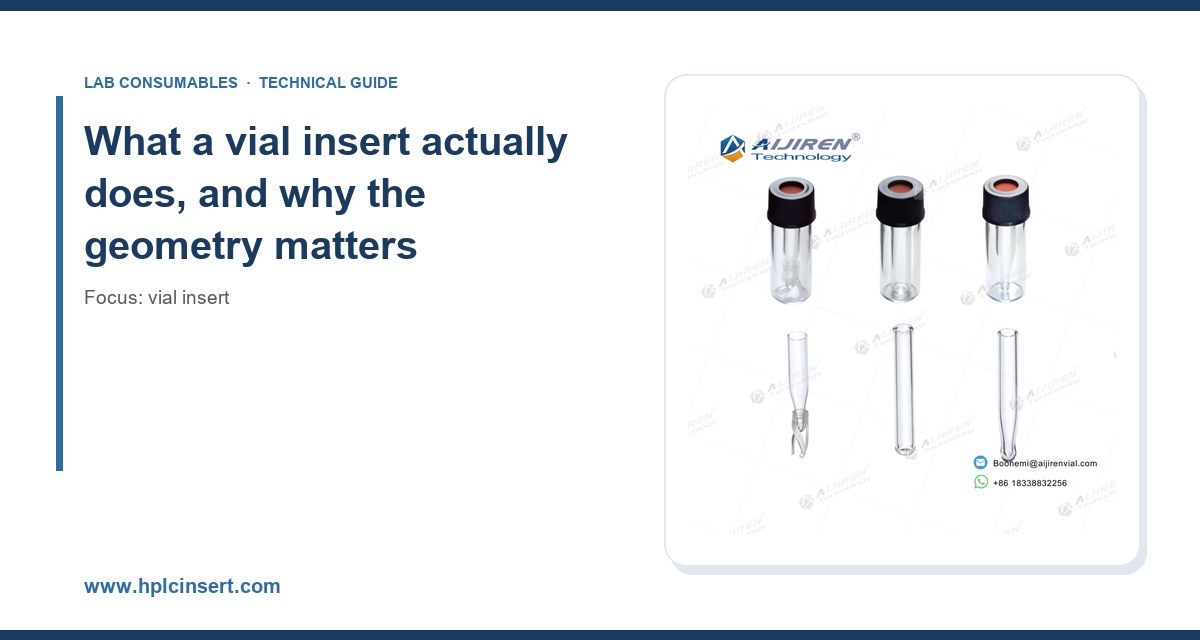
I have watched a lab buy 20,000 glass inserts on price alone, then spend three weeks chasing a ghost peak that turned out to be silicone oil leaching from a non-inert, unwashed insert. The cost of that insert was about nine cents. The cost of the investigation, the reruns, and the delayed release was north of $11,000. That is the whole argument for this guide in one sentence: an insert is the cheapest part of your HPLC or GC system and the one most likely to quietly wreck your data. Below is how I actually specify, buy, and qualify them.
If you want the short version: match the insert to the vial, match the polymer and glass to the solvent and the detector, and never accept a dimensional drawing without a measured sample. Everything else is detail, and the detail is where the money goes.
A vial insert is a small glass or plastic cup that sits inside a standard sample vial so that a low sample volume can still be reached by the autosampler needle. The standard outer vial for HPLC autosamplers is the 12 x 32 mm crimp or screw-thread vial, and the near-universal neck finish is the 8-425 screw thread or the 11 mm crimp. The 2 mL nominal capacity is a convention, not a measurement: a real 12 x 32 mm vial holds roughly 1.5 to 1.8 mL when filled to a sane working level. If you are still buying the outer container without thinking about the insert that goes in it, start with a look at 2 mL sample vials and confirm the neck finish and internal depth your autosampler expects.
The insert’s job is to raise the liquid column so the needle can aspirate it. Autosamplers like the Agilent 1260/1290 series, the Thermo Vanquish, and the Waters Alliance all have a defined needle penetration depth and a defined “bottom sense” behavior. Some needles are fixed-depth and will crash into a glass bottom; some have a spring-loaded foot that tolerates a soft or conical base; some use a pressure sensor. If your insert bottom is too thick, the needle stops short and you lose the last 30 to 50 microliters. If it is too thin or the base is off-center, the needle hits glass and you get a bent needle, a cracked insert, and a run that fails at 3 a.m. with nobody watching.
The practical consequence: the internal depth of the insert, the residual volume at the bottom, and the concentricity of the cup all matter more than the wall thickness. A good insert leaves less than 2 microliters of unrecoverable volume in a conical format and centers itself in the vial so the needle path is repeatable run after run.
The formats, and when each one is wrong
Conical (cone-bottom) inserts
These are the default for HPLC. A 150 microliter or 250 microliter conical insert in a 12 x 32 mm vial gives you a usable sample volume of about 100 to 200 microliters with a dead volume of 1 to 2 microliters. The taper funnels liquid to a point the needle can reach. They are the right choice for precious samples, for methods where you inject 1 to 5 microliters, and for any workflow where the sample is the expensive part (impurity standards, metabolite fractions, degradation studies).
They are wrong when your sample is viscous or contains particulates that settle into the cone and block the needle, and they are wrong when your autosampler uses a fixed needle that cannot reach within 1 mm of the bottom.
Flat-bottom (cylindrical) inserts
A flat-bottom insert holds more volume for the same height and is easier to pipette into and out of. Residual volume is higher, typically 5 to 15 microliters depending on diameter, because a flat base cannot funnel. Use these for larger injection volumes, for sample prep steps where you need to vortex or sonicate inside the insert, and for any workflow where you are pipetting manually and want a stable liquid column. Do not use them when sample volume is the constraint.
Glass vs. plastic (polypropylene) inserts
Glass is the default for HPLC and GC because it is inert, transparent to UV, and does not adsorb most analytes. Borosilicate glass (Type I, USP <660>) has low alkali release and is the right grade for pH-sensitive work. Polypropylene inserts are cheaper, unbreakable, and useful for ion chromatography and for workflows where glass shards are a safety problem, but polypropylene adsorbs hydrophobic analytes and can leach oligomers. I have seen polypropylene inserts give 8 to 12 percent low recovery on hydrophobic pesticides. If your analytes are nonpolar, use glass.
Pull-out and shell inserts
A “pull-out” or “shell” insert is a thin-walled glass cup that sits inside a plastic sleeve. The sleeve gives you the mechanical fit and the glass gives you the inertness. These are the best compromise for high-throughput labs because the plastic sleeve protects the glass during handling and the glass protects the sample from the plastic. The tradeoff is cost, typically two to three times a plain glass insert.
Selection criteria with numbers you can actually specify
Here is the specification sheet I hand to a new supplier. Every line is a number because “high quality” is not a purchase order line item.
- Outer diameter: 6.0 mm for standard 12 x 32 mm vials (fits the 8-425 or 11 mm neck). Confirm against your autosampler’s insert guide, not the vial catalog.
- Height: 31.0 to 31.5 mm for a full-height insert; 29 mm for a short insert used with a cap that has a septum that protrudes.
- Wall thickness: 0.4 to 0.6 mm. Thinner walls crack under cap torque; thicker walls reduce usable volume.
- Residual volume: under 2 microliters for conical, under 10 microliters for flat-bottom.
- Glass grade: Type I borosilicate, USP <660> compliant, with a certificate of analysis.
- Inertness: deactivated (silanized) for analytes that adsorb to bare glass; specify “deactivated” and demand a test chromatogram.
- Temperature rating: borosilicate glass is fine to 500 degrees C; polypropylene inserts are limited to about 120 degrees C and should not be autoclaved repeatedly.
- Puncture count (for cap septa, which you buy with the insert): silicone/PTFE septa are good for 1 to 3 punctures before coring; pre-slit septa for 5 to 10; PTFE-faced silicone for 3 to 5. If your autosampler does 200 injections from one vial, you need a septum rated for that or a method that changes vials.
- Cap torque: 0.6 to 1.0 N·m for screw caps. Over-torque crushes the septum and deforms the insert; under-torque leaks and evaporates. Use a torque wrench or a cap torque tester, not your wrist.
- Cleanliness: specify “washed and baked” for glass, with a maximum extractable residue. Ask for the wash protocol.
That last point is the one buyers skip and the one that costs the most. A “clean” glass insert from a low-cost supplier can carry mold-release residue, cutting oil, or sodium from the annealing process. Ask for a blank injection chromatogram at your detection wavelength and at your injection volume. If the supplier cannot produce one, that is your answer.
The decision checklist: matching insert to workflow
Use this table as a starting filter. The numbers are the ones I have validated across HPLC, GC, and LC-MS workflows.
- Sample volume under 100 microliters, HPLC-UV: 150 microliter conical glass insert, deactivated, residual under 2 microliters, 8-425 screw cap with PTFE/silicone septum, torque 0.8 N·m.
- Sample volume 100 to 300 microliters, HPLC-UV: 250 microliter conical glass insert, same cap, or a 300 microliter flat-bottom if you need to vortex.
- LC-MS with hydrophobic analytes: glass only, deactivated, no plastic contact with the sample. Polypropylene is out.
- Ion chromatography or high-pH work: polypropylene insert is acceptable; glass can leach sodium and borate at pH above 9.
- GC with a split/splitless inlet and a 10 microliter syringe: 250 microliter conical glass insert with a wide mouth; confirm the syringe can reach the cone without bending.
- Headspace or large-volume injection: skip the insert; use a 10 mL or 20 mL headspace vial and a different autosampler configuration.
- High-throughput screening, 96-well plate format: a plate is not an insert; do not force a vial insert workflow into a plate reader.
If you are assembling a full method, the insert is one line in a larger bill of materials. The rest of that bill lives in HPLC consumables, and it is worth checking that your insert, vial, cap, and septum come from one qualified supply chain rather than four.
What the standards actually say
There is no single ISO standard for “vial insert.” The relevant references are the dimensional conventions in the autosampler vendor’s consumables catalog, the glass grade in USP <660> (containers, glass), and the chemical resistance guidance in ISO 3585 for borosilicate 3.3 glass. The GPI 8-425 and GPI 11 mm thread and crimp conventions define the neck finish, not the insert. When a supplier claims “ISO certified inserts,” ask which standard and which certificate. Usually they mean ISO 9001 for the factory, which says nothing about the insert’s dimensions or inertness.
For regulated work, the insert becomes part of the sample handling procedure, and that procedure is auditable. If you are running environmental methods, the sample container and handling requirements in the U.S. EPA SW-846 test methods apply to the whole chain, including the insert. If you are running USP methods, the insert’s extractables are part of your method validation. Neither standard tells you which insert to buy, but both tell you that you must be able to defend the choice.
Operational precautions that prevent most failures
Most insert failures I have investigated were not manufacturing defects. They were handling and fit problems. The list below covers the ones that recur.
Fit and insertion
Never force an insert into a vial. If it does not drop in and seat with light pressure, the outer diameter or the vial’s internal diameter is out of spec. Measure both with calipers on a sample of 20. A 0.1 mm interference is enough to crack an insert when the cap is torqued. The insert should sit level, with the rim at or just below the vial’s shoulder, so the cap septum does not press on the insert rim.
Capping and torque
Torque screw caps to 0.6 to 1.0 N·m. Above 1.2 N·m you start to extrude the septum, which changes the needle path and can coring the septum on the first puncture. Below 0.4 N·m the cap backs off during a long run and you lose volume to evaporation. A 200 microliter sample in a 250 microliter insert can lose 5 to 10 percent of its volume in 24 hours at room temperature with a loose cap. That is a 5 to 10 percent error in your calibration curve, and it will not look like a capping problem. It will look like a drifting response factor.
Needle depth and bottom sensing
Set the autosampler needle depth to leave at least 0.5 mm of clearance above the insert bottom. If your autosampler supports bottom sensing, enable it and verify it on a sacrificial insert. A bent needle is a $40 part and a four-hour delay; a needle that punches through the insert and into the vial is a $200 autosampler repair and a lost day.
Evaporation and light
For light-sensitive analytes, use amber glass inserts or an amber vial. For volatile solvents, use a septum with a PTFE face and check the insert’s headspace. A conical insert with 100 microliters in a 250 microliter cup has a large headspace-to-liquid ratio; that is fine for aqueous samples and a problem for dichloromethane.
Cleaning and reuse
Glass inserts can be reused if you wash with a validated protocol: solvent rinse, detergent, DI water, then bake at 200 to 250 degrees C for at least 2 hours. Do not reuse inserts that held biological samples or high-concentration standards. Polypropylene inserts should be treated as single-use. Reuse is a false economy if you cannot prove the blank is clean.
Buying: what to ask, what to measure, what to reject
I qualify every new insert supplier with a three-part test. It takes a day and it has saved me more than it cost every time.
- Dimensional audit: measure 20 inserts for outer diameter, height, wall thickness, and residual volume. Reject the lot if more than 2 percent are outside your tolerance.
- Blank injection: inject 10 microliters of your mobile phase from a clean insert at your detection wavelength. The baseline should be flat within your method’s noise. Any peak above 0.5 mAU at 210 nm is a conversation.
- Extractables screen: soak 10 inserts in 1 mL of acetonitrile for 24 hours and run the extract on your LC-MS. Look for siloxanes, phthalates, and plasticizers. This is the test that catches the silicone oil problem I opened with.
Ask for the certificate of analysis with the glass grade, the wash protocol, and the lot number. Ask whether the inserts are deactivated and, if so, with what. Ask for the dimensional drawing and compare it to your autosampler’s specification. A supplier who cannot answer these questions in writing is a supplier who will cost you a week.
For the outer vial and cap, the same discipline applies. If you are standardizing a workflow, look at the full vial insert range alongside the vial and cap, and confirm the neck finish and insert height as a set. Mixing an 11 mm crimp vial with an 8-425 screw insert is a common and expensive mistake.
Troubleshooting checklist
When the data goes wrong and you suspect the insert, work through this in order. It is ordered by frequency, not by severity.
- Peak height dropping over a run: check cap torque and septum integrity first. A loose cap or a cored septum loses volume to evaporation. Re-torque to 0.8 N·m and re-run.
- Ghost peaks at 210 to 220 nm: suspect insert extractables. Run a blank from a new, washed insert and compare. If the ghost disappears, the insert lot is the problem.
- Low recovery on hydrophobic analytes: suspect polypropylene adsorption or bare (non-deactivated) glass. Switch to deactivated glass and repeat the recovery study.
- Needle errors or bent needles: check insert concentricity and needle depth. Measure the insert’s internal depth against the autosampler spec. Look for cracked inserts in the tray.
- Inconsistent injection volumes (RSD above 2 percent): check that the insert is seated level and that the liquid column is above the needle’s minimum aspiration depth. A 50 microliter sample in a 250 microliter insert can give 3 to 5 percent RSD from surface tension alone.
- Cracked inserts: check cap torque and vial internal diameter. Over-torque and out-of-spec vials are the two causes I see most.
- Carryover between samples: check that the insert is not being reused without a validated wash. A single-use policy fixes most carryover that is not in the injector.
A note on the supply chain
Inserts are a commodity, and commodities attract suppliers who compete on price and hide the difference in the certificate. The difference is real: glass grade, wall thickness control, wash protocol, deactivation, and dimensional consistency. A qualified chromatography supplier will give you the drawing, the CoA, and the blank chromatogram without being asked twice. The vendor catalogs from Agilent and Thermo Fisher are useful for the dimensional conventions and the autosampler-specific fit, and Restek’s technical resources are worth reading on septum and inlet consumables because the same coring and bleed logic applies to the insert cap.
Recommendation
For a general-purpose HPLC lab, specify a 150 microliter conical borosilicate glass insert, deactivated, 6.0 mm outer diameter, 31 mm height, residual volume under 2 microliters, paired with an 8-425 screw cap and a PTFE/silicone septum torqued to 0.8 N·m. Buy it from a supplier who provides a dimensional drawing, a certificate of analysis with the glass grade and wash protocol, and a blank injection chromatogram. Qualify each lot with a 20-piece dimensional audit and a blank injection. For LC-MS and hydrophobic analytes, stay with glass and demand deactivation. For ion chromatography and high-pH work, polypropylene is acceptable. For high-throughput workflows, the pull-out glass-in-plastic insert is the best compromise between inertness and handling. And for any workflow where the sample is the expensive part, the insert is not the place to save nine cents.
The takeaway: an insert is a precision part with a dimensional spec, a chemical spec, and a cleanliness spec. Buy it against all three, measure what arrives, and keep the certificate. The labs that do this spend less on inserts and far less on investigations.
References & further reading
Related resources from our lab consumables network:
- Vial Insert at hplcinsert.com
- 2Ml Vial at 2mlsamplevial.com
- Hplc Consumables at hplcconsumable.com
- Chromatography Supplier at chromatographysupplier.com
External references and standards: